Introduction:
There are times when Microsoft releases the latest major version upgrade for Business Central Upgrade and you face many issues with it.
As soon as the bugs are reported to Microsoft, they start to fix them and ask you to upgrade to a certain Cumulative Update.
As soon as the bugs are reported to Microsoft, they start to fix them and ask you to upgrade to a certain Cumulative Update.
In this blog, I will be sharing my experience with Business Central v21 CU0 upgrade to Business Central v21 CU2.

Pre-requisites:
- Business Central DVD for Latest CU
- Basic Understanding of Business Central CU Updates
Books & References:
Demonstration:
1. Check the current state of BC:
As part of knowing the current state of your Business Central environment, I'm assuming that your Business Central Environment will have some data in the standard Base App also there will be customization with extended tables and newly created tables.
As part of knowing the current state of your Business Central environment, I'm assuming that your Business Central Environment will have some data in the standard Base App also there will be customization with extended tables and newly created tables.
 |
| Customization - TableExtension on Customer Table |
 |
| Customization - Custom Table created |
2. Prepare Business Central Environment for CU upgrade:
In Order to start with BC Upgrade process it is recommend to have appropriate license and unsintall all the apps that are present as Extension.
Uninstall All the Apps installed
Get-NAVAppInfo -ServerInstance $BcServerInstance -Tenant $TenantId | % { Uninstall-NAVApp -ServerInstance $BcServerInstance -Tenant $TenantId -Name $_.Name -Version $_.Version -Force}

Unpublish-NAVApp -ServerInstance $BcServerInstance -Name System

This command will Unpublish the System App. As System App is Symbol only, it cannot be installed. Hence, you will need to Unpublish.
Stop NAVServerInstance
Stop NAVServerInstance
Now you can stop the Business Central Server Instance.
Stop-NAVServerInstance -ServerInstance $BcServerInstance
Stop-NAVServerInstance -ServerInstance $BcServerInstance

3. Upgrade Platform:
You can now Uninstall your Business Central through Add/Remove programs.

This wizard will completely uninstall your current version of Business Central.
Reboot your machine before running the installation of upgraded CU version.
During installation of Business Central version, select the following components only.
- AL Development Environment
- Server
- Web Server Components
Follow the installation steps as per screenshots below-
 |
| Business Central Setup Wizard |
 |
| Accept EULA |
 |
| Select Advanced Installation |
 |
| Choose an Installation Option |
 |
| Choose Developer |
 |
| Customize you installation |
 |
| Set SQL Database to BLANK |
 |
| Business Central Installation |
Note that the DatabaseName should be BLANK. If you set the Database Name of your old version of Business Central, the installation will fail.
Now link you old database to Business Central Server Instance using Set-NAVServerConfiguration

Do not Restart/ Start Business Central Server Instance yet.
You can take a database checkpoint backup at this point in case you mess things up.
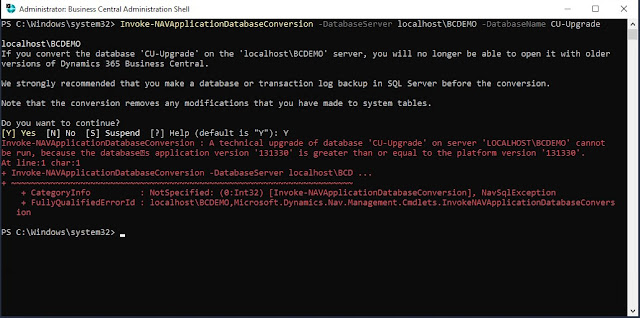
4. Upgrade Application:
Convert Database - This will convert the application as per the latest installation. If your Database is already converted then you will get errors as follows.

You can Restart/Start your Business Central Server Instance now. If your Database has converted successfully then your BC Server Instance will start.

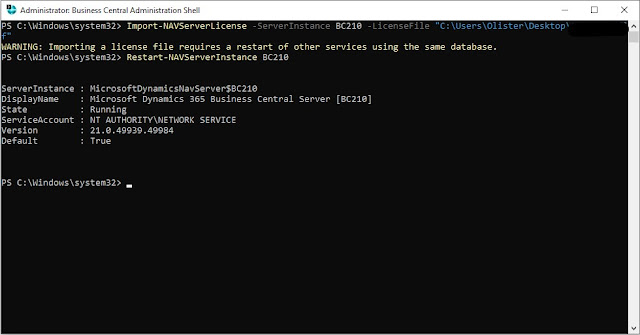
Import-BC Partner License:
Ensure you have the Developer License uploaded to the Database. You can also upload License using Import-NAVServerLicense -ServerInstance BC210 -LicenseFile <LICENSE FILE PATH>


Sync-NAVTenant: This command synchronizes schema to the DB.


To know the status of the NAV Data Upgrade command, run the Get-NAVDataUpgrade -ServerInstance BC210 -ErrorOnly command

Install Extensions:-
You will also need to update the Customer License as per the latest BC version and import the license in BC.


Publish NAV Apps :-
1. System App - You will get this App in DVD\ModernDev\program files\Microsoft Dynamics NAV\210\AL Development Environment
This App is necessary before all other apps are installed.

2. System Application - You will find the System Application in DVD\Applications\system application\source.
To publish System Application use the command -Serverbelow
Publish-NAVApp -ServerInstance BC210 -Path "C:\Users\Olister\Downloads\Dynamics.365.BC.49990.CA.DVD\Applications\system application\source\Microsoft_System Application.app" -SkipVerification
You will also need to Sync NAV App.
Sync-NAVApp -ServerInstance BC210 -Name 'System Application'
You will also need to Upgrade the App Data.
3. Base Application - You will find the Base Application in DVD\Applications\BaseApp\source.
"C:\Users\Olister\Downloads\Dynamics.365.BC.49990.CA.DVD\Applications\BaseApp\source\Microsoft_Base Application.app" -SkipVerification
You will also need to Sync NAV App.
Sync-NAVApp -ServerInstance BC210 -Name 'Base Application'
You will also need to Upgrade the App Data.
Start-NAVAppDataUpgrade -ServerInstance BC210 -Name 'Base Application' -Version 21.2.49946.49990
4. Application - You will find the Base Application in DVD\Applications\Application\source.
"C:\Users\Olister\Downloads\Dynamics.365.BC.49990.CA.DVD\Applications\Application\source\Microsoft_ Application.app" -SkipVerification
You will also need to Sync NAV App.
Sync-NAVApp -ServerInstance BC210 -Name 'Application'
You will also need to Upgrade the App Data.
Start-NAVAppDataUpgrade -ServerInstance BC210 -Name 'Application' -Version 21.2.49946.49990
Also, you can upload the other Microsoft Extensions as well as Customizations to get more functionality.
Set NAVApplication: This command will set the Application version to the Version No you provide.
Set-NAVApplication -ServerInstance BC210 -ApplicationVersion 21.2.49946.49990 -Force
Set-NAVApplication -ServerInstance BC210 -ApplicationVersion 21.2.49946.49990 -Force
Sync-NAVTenant: This command synchronizes schema to the DB.
Start NAV Data Upgrade: This command will upgrade the Data as per the latest extensions in BC.
To start the NAV Data Upgrade, you need to close all the active sessions.
To start the NAV Data Upgrade, you need to close all the active sessions.
Start-NAVDataUpgrade -ServerInstance BC210 -FunctionExecutionMode Serial -Force -Tenant default
To know the status of the NAV Data Upgrade command, run the Get-NAVDataUpgrade -ServerInstance BC210 -ErrorOnly command
Install Extensions:-
At the bare minimum, you will need to install System Application, Base Application, and Application to start your BC environment.
Run Install-NAVApp -ServerInstance BC210 -Name 'Base Application' -Version 21.2.49946.49990 to install the extension. in this case, I have installed the Base Application
You will also need to update the Customer License as per the latest BC version and import the license in BC.
Restart Server Instance once all the upgrade and installation is completed and you are ready with the environment.
Now that I have updated Business Central from BC 21 CU0 to BC21 CU2 you can see the update.
Conclusion:
Well, this is how you can upgrade your CU updates for a certain BC version. There are CU updates released every month and you can update your Business Central On-Prem to the latest ones. When Microsoft officially stops releasing these CU updates, it's time to upgrade your BC to the latest major version.
In case there are any questions, refer to https://learn.microsoft.com/en-us/dynamics365/business-central/dev-itpro/upgrade/upgrading-cumulative-update-v21
Feel free to connect with me at olisterr@outlook.com if there are any issues.
Comments
Post a Comment
Let me know your comments below. I'll try my best to answer your comment