Migrate your Business Central Server VM on Azure

Introduction:

When you setup a Business Central Server on Azure for Development / Non- production activities and do not have Disaster Recovery backup setup, there are chances that your VM might not boot up.

Most of the times there are issues with billing, networking or even Windows Update and still can be recovered through Azure Support.

However the situation I face was Blue Screen of Death and there was lower chances of booting up.

Pre-requisites:

  • Fundamental understanding of Azure
  • Microsoft Azure Subscription 

Demonstration:

1. Create Disk Snapshot:
Generally installations can be done again. However Databases are something important for you.
Hence, you will need to attach your crashed VM Disk Drives as auxiliary Disk Drives to a working VM.

For existing Drives, you will need to make a Disk Snapshot from the existing Disk Drive.

Go to VM > Disks > Select Disk Drive > Make Snapshot.

Disk Drive you would like to backup

Create Disk Snapshot

Create Disk Snapshot > Provide Disk Snapshot details

Confirm creation of Disk Snapshot

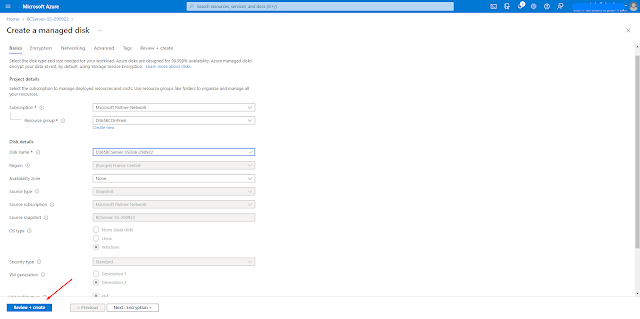
2. Create Disk Drive from Disk Snapshot:
This action will create Disk Drive from the Snapshot. This process is similar to creating Disk from ISO Image.
Go to Disk Snapshot > Create Disk

Create Disk Drive from Snapshot

Confirm creation of the Disk

3. Create a new VM and attach the Disk Drive:
Once the Disk Drive is created, you can attach the Disk Drive just as if you are physically attaching disk to server.
Go to VM > Disks > Attach existing Disk

Attaching Disk Drive to VM

Once you have attached the disk, you will see that in the VM the disk is mounted in This PC.
Disk Mounted in This PC

Conclusion:

The intent of this blog was to help in recover your existing data in VM. I hope this approach helps in setting up the VM.

NOTE: For Production VMs, it is recommend to have Business Continuity and Disaster Recovery Setup. Refer my blog https://www.olisterr.blogspot.in/2021/05/setup-sql-server-backups-for-business.html

Thanks & Cheers!!

Comments

Popular posts from this blog

Something went wrong. An Error occurred - Error Resolution

Introduction: With the installation of NAV 2018 or BC On-premise, I have observed that when creating New Server Instance and New WebServer Instance, you will get the error 'Something went wrong. An Error occurred '. I referred to the community questions below but didn't find my resolution. Hence, I decided to write this blog. Pre-requisites: Microsoft Dynamics Business Central - On-Premise / NAV 2018 Understanding of Business Central Authentication  Books & References: https://community.dynamics.com/nav/f/microsoft-dynamics-nav-forum/261301/nav-2018-web-client-an-error-has-occurred https://community.dynamics.com/business/f/dynamics-365-business-central-forum/421987/error-something-went-wrong-an-error-has-occurred-azure-ad-tenant Demonstration: 1. Creation of NAVServerInstance: In order to create NAVServerInstance, you can either add the Server Instance through Business Central Administration or Powershell command. Add Instance - Business Central Administration Add Insta

How to resolve 'Edit in Excel' issues

  Introduction: As you know that D365 BC offers Edit in Excel functionality. But manipulating or customizing such a  standard functionality is difficult as there is not much control available. Hence, solving issues is also a difficult task. I will be resolving the issue for this specific issue, however, the debugging steps are similar. Pre- requisites : ODATA V4 Connectivity tool for Webservices Microsoft Dynamics 365 Business Central Books & References: https://community.dynamics.com/business/f/dynamics-365-business-central-forum/448226/issue-with-excel-add-in/ Demonstration: The way Edit in Excel works is that for a given page a Webservice is created adding PageID and Page Name. Hence, there are some Webservice connectivity checks in place to validate. 1. Edit in Excel Custom Action on the page: If you are adding Edit in Excel Action on the page, please ensure that you are providing appropriate PageName and Filter criteria as Webservice is using these parameters Refer Editworkshe

Installing LS Central - POS on local machine

Introduction: In this blog, I'm attempting to capture the LS Central - POS installation process on Local Machine. This blog has nothing to do LS Central - Server Setup for POS. LS Retail / LS Central - On Premise POS Pre- requisites : LS Central Installed on Server SSL Setup on LS Server (https://www.olisterr.tech/2020/03/how-to-setup-navuserpassword-with-ssl.html) LS - POS Installer Business Central - On Premise Installer Demonstration: Once your LS Retail / LS Central POS is setup on the main server. Just prior to Go-Live, you will actually have to install this POS on multiple systems and connect these POS to the main server with LS Retail / LS Central. 0.Preparation: Prior to actually installing Business Central On-Premise Windows Client, you need to make sure that you're able to ping the target with the correct Port number. For this I made use of PS-Ping tool.  PSPing - IP Address: Port If you're unable to PS-Ping the correct IP with Port number, simply check the Advan