Introduction:
In this blog, I'm attempting to capture the LS Central - POS installation process on Local Machine.
This blog has nothing to do LS Central - Server Setup for POS.
This blog has nothing to do LS Central - Server Setup for POS.
 |
| LS Retail / LS Central - On Premise POS |
Pre-requisites:
- LS Central Installed on Server
- SSL Setup on LS Server (https://www.olisterr.tech/2020/03/how-to-setup-navuserpassword-with-ssl.html)
- LS - POS Installer
- Business Central - On Premise Installer
Demonstration:
Once your LS Retail / LS Central POS is setup on the main server. Just prior to Go-Live, you will actually have to install this POS on multiple systems and connect these POS to the main server with LS Retail / LS Central.0.Preparation:
Prior to actually installing Business Central On-Premise Windows Client, you need to make sure that you're able to ping the target with the correct Port number. For this I made use of PS-Ping tool.
Prior to actually installing Business Central On-Premise Windows Client, you need to make sure that you're able to ping the target with the correct Port number. For this I made use of PS-Ping tool.
 |
| PSPing - IP Address: Port |
If you're unable to PS-Ping the correct IP with Port number, simply check the Advanced Firewall Setting in Inbound and Outbound Rules.
Inside Windows:
Inbound Port 7046
Outbound Port 7046
In Azure:
Inbound Port 7046
Outbound Port 7046
Inside Windows:
Inbound Port 7046
 |
| Inbound Rules - Port 7046 |
Outbound Port 7046
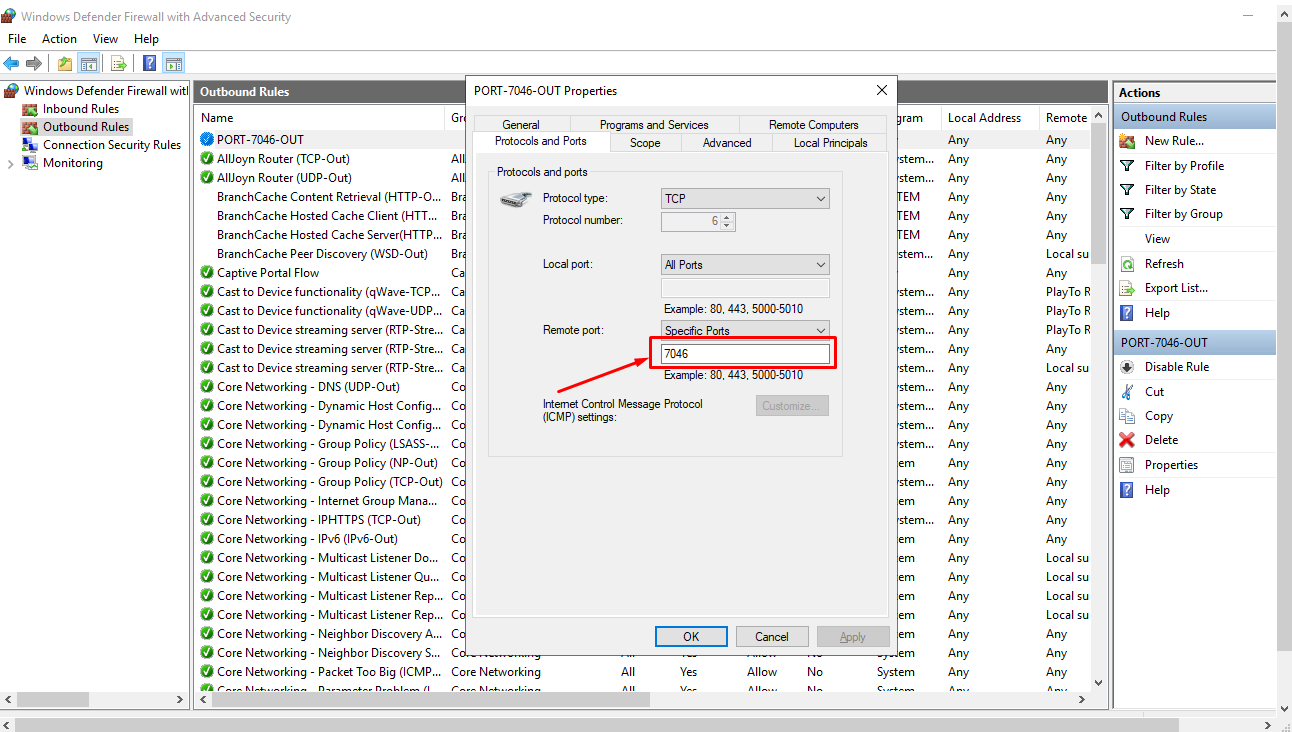 |
| Outbound Rules - Port 7046 |
In Azure:
Inbound Port 7046
 |
| Inbound rules - Port 7046 |
Outbound Port 7046
 |
| Outbound Rules - Port 7046 |
1. Install NAV / Business Central Windows Client:
In Business Central On-Premise Installer, simply select the Windows Client and remove all other components.
Goto C:\Users\<YOUR USERNAME>\AppData\Roaming\Microsoft\Microsoft Dynamics NAV\140
 |
| Install the NAV / Business - On Premise Windows Client Component |
Goto C:\Users\<YOUR USERNAME>\AppData\Roaming\Microsoft\Microsoft Dynamics NAV\140
You will find the ClientUserSetting.config file and change the parameters as marked
<?xml version="1.0" encoding="utf-8"?>
The result should be you getting access to Windows Client.
<?xml version="1.0" encoding="utf-8"?>
<configuration>
<appSettings>
<add key="Server" value="YOUR SERVER" />
<add key="ClientServicesPort" value="7046" />
<add key="ServerInstance" value="BC140" />
<add key="TenantId" value="" />
<add key="ClientServicesProtectionLevel" value="EncryptAndSign" />
<add key="UrlHistory" value="localhost:7046/BC140" />
<add key="ClientServicesCompressionThreshold" value="64" />
<add key="ClientServicesChunkSize" value="28" />
<add key="MaxNoOfXMLRecordsToSend" value="5000" />
<add key="MaxImageSize" value="26214400" />
<add key="ClientServicesCredentialType" value="NavUserPassword" />
<add key="ACSUri" value="" />
<add key="AllowNtlm" value="true" />
<add key="ServicePrincipalNameRequired" value="False" />
<add key="ServicesCertificateValidationEnabled" value="true" />
<add key="DnsIdentity" value="" />
<add key="HelpServer" value="" />
<add key="HelpServerPort" value="0" />
<add key="ProductName" value="" />
<add key="TelemetryDeploymentType" value="" />
<add key="TelemetryInstrumentationKey" value="" />
<add key="UnknownSpnHint" value="(net.tcp://localhost:7046/BC140/Service)=NoSpn;(net.tcp://YOURSERVER:7046/BC140/Service)=NoSpn;" />
</appSettings>
</configuration>
 |
| Windows Client |
Simply install the LS Retail POS Setup just as you would on your server, and change the config file.
After this is done, head over to C:\Program Files (x86)\LS Retail\NAV\LSStart and find the file LSStart.exe.config File.
Replace the <Nav> section with and change the parameters as marked.
<Nav>
<Title>POS</Title>
<ExePath>C:\Program Files (x86)\Microsoft Dynamics 365 Business Central\140\RoleTailored Client\Microsoft.Dynamics.Nav.Client.x86.exe</ExePath>
<Username />
<Password />
<Domain />
<NetLogin>false</NetLogin>
<WaitForExit>true</WaitForExit>
<Company>TEST</Company>
<Object>
<Type>Page</Type>
<Id>99008950</Id>
<Name>EPOS Main</Name>
</Object>
<ServiceTierList>
<ServiceTier>
<Name>BC140</Name>
<Port>7046</Port>
<Host>YOUR SERVER URL</Host>
</ServiceTier>
</ServiceTierList>
<WindowMode>Fullscreen</WindowMode>
</Nav>
The final result will be that you will get access to LS Retail POS. |
| LS Retail POS |
3. Access Web - POS:
This method is suitable for mobile devices such as Tablets, Phones or mini-computers.
Simply login into your Browser with the Web Client URL
 |
| Business Central - Web Client |
 |
| Select the LS Retail Role |
Once, you have selected the correct Role, automatically your Business Central session will refresh and will initiate LS Retail Web-POS
 |
| LS Retail - Web POS Initializing |
 |
| LS Retail - Web POS - Login Screen |
| LS Retail - Web POS - Transactions |
Conclusion:
Although this might look like a complicated process, it is relatively easier than the SSO setup.
Just that you need to verify connectivity at each step. Overall the gist is you just install the client, modify configurations like IP and Port and Instance name and Credential Type and you're done.
I hope this helps 😉
Just that you need to verify connectivity at each step. Overall the gist is you just install the client, modify configurations like IP and Port and Instance name and Credential Type and you're done.
I hope this helps 😉
Comments
Post a Comment
Let me know your comments below. I'll try my best to answer your comment