How to Upgrade Data from Microsoft Dynamics NAV to Microsoft Dynamics Business Central On Premise - Part 2
Introduction:
Now that the first step of the problem preprocessing of the NAV Database to make it ready to be migrated to BC is done(refer Part 1 ), we can now proceed further with connecting the database in Business Central On-Premise.

Pre-requisites:
- Microsoft Dynamics 365 Business Central
- Microsoft Dynamics for NAV
- Microsoft SQL Server Management Studio (SSMS)
- Powershell ISE
- Understand NAV to BC Upgrade Considerations - Click here
- Understand Upgrade Path - Click here
Books & References:
https://docs.microsoft.com/en-us/dynamics365/business-central/dev-itpro/upgrade/upgrade-considerations#onlinehttps://docs.microsoft.com/en-us/dynamics365/business-central/dev-itpro/upgrade/upgrade-paths
Demonstration:
1. Install Business Central On-Premise(v14 - Spring 19)
i. After installing the BC OnPrem, you can navigate to the path 'C:\Program Files\Microsoft Dynamics 365 Business Central\140\Service\'.
ii. Run the finsql.exe as Administrator and open the respective NAV 2017 DB.
ii. Run the finsql.exe as Administrator and open the respective NAV 2017 DB.

2. Convert the Database to the latest version:
The Database that we now open in the latest version of finsql.exe has to be converted to the latest compatible version.
Note: After conversion, the same database cannot be opened in NAV 2017 Development Environment.
Note: After conversion, the same database cannot be opened in NAV 2017 Development Environment.

If the License File is not uploaded, the conversion will not proceed further.
 |
| Conversion of Database is in progress |
 |
| The database is converted. |
3. Merge BaseApp Objects with Customized Tables:
Now that your Database is converted in BC with just the tables, ensure that the main component of BaseApp is merged along with your customization.
Now that your Database is converted in BC with just the tables, ensure that the main component of BaseApp is merged along with your customization.
Now you can go ahead and merge the objects and import the Merged Objects through FOB or TXT files.
Go to File > Import > Select FOB files.
Go to File > Import > Select FOB files.

Ensure that while you are importing the objects, the Database Synchronization is set to Later.

4. Import Upgrade Objects from Upgrade Toolkit(Product DVD):
Go to File > Import > Select FOB files.
Go to File > Import > Select FOB files.
Depending upon the version you are upgrading from, you have to select the appropriate file.
 |
| Select Upgrade Object |
 |
| No conflicts found. Hit Yes. |
 |
| Set Database Schema Sync to Later |
Post import of the Upgrade Objects, you should be able to see the following objects.

5. Connect Business Central Server Instance with the Database:
Connect Business Central Server Instance to the converted Database by changing the Server Name, Server Instance, and Database Name in Business Central Administration.
Also, increase SQL Command Timeout as Production Database size is large.
 |
| Business Central Administration |
Ensure that the Business Central Server Instance is in the Running state.
In the C/AL Development Environment select the Server Instance in NAV Service Tier.
Go to File > Database > Information > General Tab > Server Instance (Select the Server Instance where you connected the Database)
Go to File > Database > Information > General Tab > Server Instance (Select the Server Instance where you connected the Database)
 |
| Select the Server Instance |
6. Compile All the Objects:
Now you can compile all the objects. For the Database Synchema Sync select Later.
 |
| Compile All Objects |
 |
| Sync Schema Mode to Later |
7. Resolve all the errors if any:
You can resolve any errors that are caused by customization.
You can also delete the objects that are no longer required.
You can also delete the objects that are no longer required.
If there are any errors you will see them with the help of MarkedOnly or Filter Compiled = NO.

For NAV 2015, NAV 2016 you can delete the following tables as they are not required.
Table Filter - 470|824|825|827|828|829|1510
For NAV 2015, NAV 2016 you can delete the following tables as they are not required.
Table Filter - 470|824|825|827|828|829|1510
Note: The compile requires Server Instance to be connected and running.
8. Set Synchronise Schema to Force:
At this point, your Objects are all set. To ensure that any of your Database Schema is not lost in the process of merging and compile
Go to Tools > Sync. Schema for All Tables > Force
 |
| Sync Schema for All Tables |
 |
| Accept the conditions and Continue |
 |
| Database Scheme Sync in progress. |
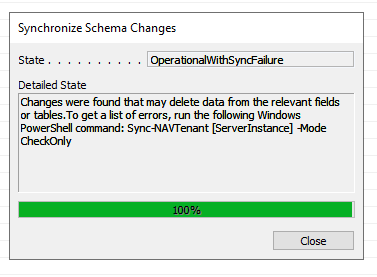 |
| Sync Schema Issues |
If there are any issues with Sync. Schema to Database as below, run the Sync-NAVTenant command with Force Mode.

After this, if you run Sync. Schema for All Table runs successfully.

9. Upgrade Application to a version of Business Central Application:
This step is required if you are upgrading from NAV2018.
You can use 'Get-NAVApplication -ServerInstance <ServerInstanceName>'
to get ApplicationVersion.
You can use 'Set-NAVApplication -ServerInstance <ServerInstanceName> -ApplicationVersion <N.N.N.N> -Force' to set the Application version.
to get ApplicationVersion.
 |
| Get-NAVApplication Command |
You can use 'Set-NAVApplication -ServerInstance <ServerInstanceName> -ApplicationVersion <N.N.N.N> -Force' to set the Application version.
10. Run Sync-NAVTenant:
You can run 'Sync-NAVTenant -ServerInstance <ServerInstanceName> -Mode Force to synchronize your objects changes to Database Schema.
Since we have already done this step in step 8 we cannot see any progress bar.
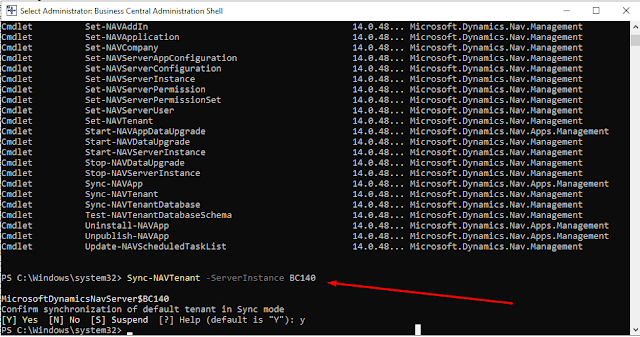
Since we have already done this step in step 8 we cannot see any progress bar.
11. Run the DataUpgrade process:
In the C/AL Development Environment. Go to Tools> Data Upgrade > Start
In the C/AL Development Environment. Go to Tools> Data Upgrade > Start
 |
| Start Data Upgrade |
 |
| Accept the pop-up |
 |
| Select Execution Mode as Serial |
 |
| Data Upgrade Process is complete! |
12: Import/ Export Permission Sets:


Delete all permission sets in the database except the SUPER permission set.
In Object Designer, run page 9802 Permission Sets, and then delete the permission sets except for SUPER.
Run XMLport 9171 and XMLport 9172 to import the permission sets and permission XML files.
However, I did not do this process as the permissions sets are to be defined as Permission Sets objects in the Business Central Extension itself.
Refer
https://docs.microsoft.com/en-us/dynamics365/business-central/dev-itpro/upgrade/upgrade-permissions
https://docs.microsoft.com/en-us/dynamics365/business-central/dev-itpro/upgrade/upgrade-permissions
13. Delete Upgrade Objects:
You can filter the Upgrade Objects with filter Version List = *UPGTK* and delete the objects.
You can now restart the server instance.
14. Clear Users and User credentials:
If you are facing issues with logins, I recommend clearing all the Users and User Personalizations through the following SQL command.
14. Clear Users and User credentials:
If you are facing issues with logins, I recommend clearing all the Users and User Personalizations through the following SQL command.
USE [Database Name]
GO
delete from [dbo].[User]
delete from [dbo].[Access Control]
delete from [dbo].[User Property]
delete from [dbo].[Page Data Personalization]
delete from [dbo].[User Default Style Sheet]
delete from [dbo].[User Metadata]
delete from [dbo].[User Personalization]
Output:
Finally, the NAV 2017 is upgraded to Business Central 14.
In the next blog, I will be demonstrating how to connect Upgraded Business Central On-Premise to VS Code and how to connect with Business Central Online and push the data to BC Online.
Comments
Post a Comment
Let me know your comments below. I'll try my best to answer your comment